Starting
Once you’ve installed the Python package, paired the robots and the camera, you can start the game controller. You should see such a message appearing:
[INFO] 2022-02-02 15:49:54,117 - robot-soccer-kit - Starting robot-soccer-kit Game Controller
[INFO] 2022-02-02 15:49:54,119 - waitress - Serving on http://127.0.0.1:7070
Meaning that the game controller is now running and serving at a local web server on port 7070. If it is not already opened, a browser should appear with the game controller’s interface:
Configuring vision
To configure the vision, first select your camera in the list. If you plug/unplug new cameras while the software is running, press “Refresh cameras” button.
Once you’ve selected the camera, click “Start” to start the capture.
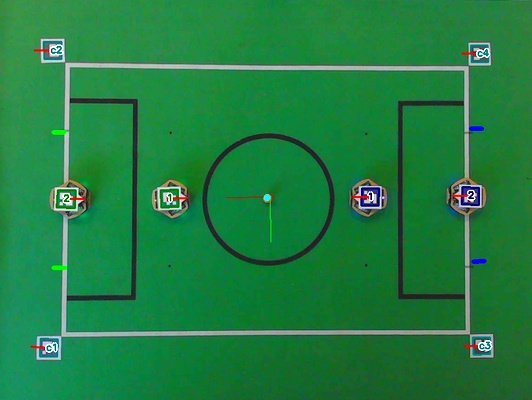
You can adjust several parameters vision using the interface. The image will be annotated with the output from the detection.
For good games quality, you should aim at reaching about 30 FPS for detection.
Custom focal
The recommended camera has its focal set in the default software. To use another camera, you can estimate the focal length by using your camera in 1920x1080 resolution, facing a plane (e.g. the floor or a wall):
\[f = \frac{l \times p}{d}\]Where:
- \(p = \sqrt{1920^2 + 1080^2} \approx 2203\) is the number of pixels on the diagonal of the image,
- \(l\) is the distance from the camera to the plane,
- \(d\) is the size of the image diagonal on the plane.
Use our field of view calculator to estimate the focal value.
Configuring robots
First, add your COM ports in the manager and just wait to check if the robots are responding. When they do, they emit a small beep and their battery level becomes available in the interface.
You can then assign them the corresponding marker, or alternatively click the “Identify” button that will get them moving a little bit to auto-assign the markers to them.
Allowing API control
In the “Control” tab, you can allow or disallow the control of robots through API/clients (see below). By default, the control boxes are ticked, allowing the control for both teams.
If you fill the “key” field with a value, it will become a key (a password) required by the teams that want to control their robots (preventing teams to control opponent robots).
If you press the “emergency” button, all the robots will stop moving, and the control boxes will be un-ticked automatically to prevent the clients to send some controls for the robot.
 Robot Soccer Kit
